Recipes

Vegan Potato Gnocchi + Delicious Tomato Sauce Recipe

Gnocchi is one of my favourite pasta dishes to make! It really brings me back to when I used to eat dinner at my Nonna’s on Sundays. Back in the day (meaning about 15 years ago), my family used to get together every September and make pasta sauce the authentic Italian way. This meant buying bushels of tomatoes, cutting them, adding a bit of salt, processing them through a machine and canning them. Everything was done by hand and we spent days outside doing this! Unfortunately this tradition has died out, but I think about it every time I make pasta in my kitchen.

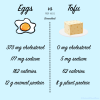
So today I thought it would be cool to show you a plant-based Gnocchi recipe and how I like to make my pasta sauce. The cool thing about these gnocchi’s is that they don’t require any eggs. They also only require three simple ingredients: potatoes, flour and oregano!

Ingredients:

For the Gnocchi:

  • About 8 medium sized red potatoes
  • 4 cups of flour
  • 3 tablespoons dried oregano (optional)

*A quick note on ingredients: please use these measurements very loosely! All potatoes are different sizes, so you may need more or less flour. The main thing is to form a dough, while adding as little flour as possible. Refer to the video below for full instructions ☺️

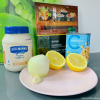
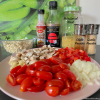
For the Tomato Sauce:

  • 1 white onion, diced
  • 3 cloves of garlic, chopped finely
  • 1 carrot, grated
  • 1-2 tablespoons soy sauce
  • 1 Package Yves Veggie Ground
  • 1 Jar of tomato sauce
  • Salt and pepper for seasoning

Directions:

Gnocchi can be tricky to make the first time so I made a video to help you out! 😊👩🏻‍🍳

Please feel free to subscribe to my brand new Youtube Channel for weekly recipes and fitness content! ✨

Recipes

Vegan Fluffy Chocolate Chip Buttermilk Pancakes

Pancakes have always been my favourite breakfast food! But ever since I went vegan, I had trouble finding a plant-based recipe that I actually liked. I found that some recipes lacked flavour, while others produced pretty flat looking pancakes (which isn’t my thing)!

Until, I found a recipe online and modified it! It turns out that the secret to fluffy and delicious buttermilk style pancakes is actually apple cider vinegar. When you combine apple cider vinegar with milk, it produces somewhat of a thick mixture that is perfect for achieving that cloud like texture that I’ve been craving!

This recipe is actually pretty simple and easy to make. I made sure to only include ingredients that most people already have at home, with the exception of apple cider vinegar. So without further ado, here’s your new favourite plant-based breakfast recipe!

Ingredients:

  • 1 cup of plant-based milk (I used Vanilla Almond Milk)
  • 1 teaspoon of apple cider vinegar
  • 1 cup all purpose flour
  • 2 tablespoons brown sugar
  • 1 tablespoon butter (+ a bit extra for cooking)
  • 2 teaspoons of baking powder
  • 1/2 a cup of chocolate chips

Directions:

  1. Start by combining the milk and apple cider vinegar in a small bowl. Set aside and let sit for at least 5 minutes, while you measure out the dry ingredients.
  2. In a large bowl, combine the flour, brown sugar, butter and baking powder. Mix until all of the ingredients are blended together.
  3. Add the milk mixture into the large bowl of dry ingredients and mix using a whisk. Be sure to smooth the batter out as much as possible! Once the batter is smooth, add in the chocolate chips.
  4. Prepare a lightly buttered pan on medium heat and use a big spoon to scoop your pancake into the pan once it’s heated.
  5. Flip using a spatula after about 4 minutes, or until the underside looks golden brown.
  6. Let cook for an additional 3-4 minutes and remove from heat.
  7. Serve hot with maple syrup, fresh fruits and icing sugar!

Quick Tips:

  • If you want your pancakes to be extremely fluffy, try using an electric mixer instead!
  • Using vanilla flavoured milk will make your pancakes taste better.
  • Make sure the pan is fully heated so the pancakes bubble a bit on the sides when you add them in!

Recipes

No Bake Apple Peanut Butter Protein Bites

One of my favourite snacks to make are my apple peanut butter protein bites! Peanut butter is a great source of protein, while apples contain a healthy amount of fiber which will keep you feeling full for longer! 💪🏼

Not to mention, my protein bites contain absolutely no preservatives, artificial colourants or flavours like most store bought granola bars. Even energy bars marketed as “healthy” contain an unnecessary amount of sugars and “natural flavours” which aren’t always vegan friendly.

I also love that they’re no bake and only take about 10 minutes to make!

Here’s what you need:

  • 4 apples
  • 2 cups large flake oats
  • 1 generous tablespoon of natural peanut butter
  • 2 tablespoons of maple syrup
  • About 2 tablespoons seed mix (I used flax and chia)
  • Cinnamon (optional)

Preparation time: 10 minutes

Serving size: makes about 12 energy bites

Directions:

  1. Start by grating the apples using a grater.
  2. In a large bowl, combine the grated apples, large flake oats, peanut butter, maple syrup and seed mix. Mix using your hands.
  3. Form mixture into about 12 bite sized balls and put aside on a plate.
  4. Sprinkle with cinnamon- all done!

Quick Tips:

  • Store in your fridge for up to 3 days to enjoy whenever you want to snack!
  • You can also use other seeds such as sunflower, pumpkin or even walnuts! Make sure to just have fun with it and customize your bites to just the way you’d like! 😋

Be sure to subscribe to my blog and follow me on Instagram for more recipes & healthy lifestyle tips! ✨

Recipes

Vegan Crunchwrap Supreme Recipe

Okay so this isn’t my healthiest recipe, but it is healthier than Taco Bell’s version! I always encourage my clients to reward themselves for staying on track and being consistent with their health- and this is the perfect way. This recipe is 100% plant based and gives you that cheesy goodness that we all crave 🤤.

It’s important to realize that it is completely okay to eat junk food sometimes! If you always ate health foods such as lentils, beans and fruits, you would become very bored with your diet and eventually not want to follow it anymore. So my advice? Eat the foods that you crave- in moderation!

The great thing about this recipe is that it actually is healthier than a Crunchwrap from Taco Bell. I used soy in place of beef, and plant based cheese instead of cheese made from cows milk. Using your own veggies at home tastes a lot better than eating toppings that have been prepared for a fast food restaurant, too!

So without further ado, here is my fresh plant based version of a Crunchwrap Supreme! 🌮

Ingredients:

For the Base

  • 1 white onion
  • 4 mushrooms
  • 2 cloves of garlic
  • Half of a green pepper
  • 1 carrot
  • 1 cup of plant based beef (I used Gardein)
  • 4 tablespoons of soy sauce
  • 3 teaspoons of liquid smoke
  • Taco Seasoning

For the Toppings:

  • 1/3 head of lettuce
  • 3 tomatoes
  • 2 avocados
  • Vegan sour cream (optional)
  • About half a cup of plant-based cheddar
  • 4 soft tortillas
  • 3 taco shells broken or tortilla chips for the crunchy layer

Preparation time: 20 minutes

Serving size: Makes 4 crunchwraps

Directions:

  1. Start by preparing the base: chop onions, garlic, mushrooms, green peppers and grate the carrot.
  2. Place base in a saucepan over medium heat with soy sauce and liquid smoke. Let cook for 2 minutes and add in the plant based beef.
  3. Mix in a bit of water with taco seasoning and let cook for 5 more minutes, remove from heat.
  4. Now it’s time to prepare the toppings! Chop the lettuce, slice the tomatoes and mash avocados and place on either a plate or bowl to make it easier to prepare your crunchwrap.
  5. Prepare a lightly oiled pan on medium heat so that it will seal nicely as soon as it’s ready.
  6. Take a soft tortilla and layer your ingredients in the centre (make sure you leave enough room to fold the edges over) I started with avocado, then added the plant based beef, cheddar, soft tortilla chips, tomatoes and lettuce. But you can customize yours however you like 😎
  7. I watched this video to learn how to properly fold a crunchwrap and although it’s very random to watch Taco Bell training videos… I highly suggest it for this purpose haha.
  8. Transfer your masterpiece to the heated pan, folded edge side down. It should make a nice sizzle. Reduce heat to medium-low to allow all of the ingredients inside to properly melt and cook.
  9. Flip after about 3 minutes or until the edges are lightly browned. Cook the other side for about the same amount of time and remove from heat.
  10. Cut in half and voila! You have a delicious, healthy version of the Crunchwrap Supreme made by you👩‍🍳👨‍🍳✨

Quick Tips:

  • Watch the video that I linked above to learn how to properly fold the edges over, it will save you a lot of time!
  • My Crunchwrap honestly looked far from perfect after folding it, but once I put it in the pan on medium heat, the edges sealed nicely and it ended up turning out better than I thought! So don’t be discouraged if it looks like an absolute mess at first- the cooking process is what really brings it together.
  • Thank you for reading my recipe! Check out my Recipes page for more plant-based goodness 🥰
Recipes

Black Bean Burgers

One of my favourite plant based meals to eat is black bean burgers!! Just one cup of black beans will set you up with 41 grams of carbohydrates, 15 grams of fiber, 15 grams of protein, and various other nutrients that all aid in healthy digestion and keep you feeling full for longer!

Cooking with dried black beans is also very cost efficient, with one cup only costing about $0.30 you can’t really go wrong!

The key is to use an Instant Pot if you have a bit of time to spare. Instant Pots are amazing because they can cook dried beans under 40 minutes without having to soak them overnight. They also retain nutrients and are one of the best methods for cooking dried beans, lentils and raw veggies into fresh delicious meals!

But if you don’t have an Instant pot or are short on time, you can use one can of black beans instead.

Ingredients:

For the bean burgers:

  • 1 cup of dried black beans
  • 3 mushrooms, chopped
  • 1 medium white onion, chopped
  • 2 cloves of garlic, chopped
  • 1 carrot, grated
  • 2 tablespoons of soy sauce
  • 2 teaspoons of liquid smoke flavouring

Toppings:

  • 2 tomatoes, sliced
  • Romaine lettuce (I used 3 pieces)
  • Half a cucumber, sliced
  • 1 avocado, mashed
  • Ketchup
  • Vegan Mayo
  • Burger buns

Preparation time: 45 minutes using dried beans or 20 minutes using canned beans

Serving size: Makes 4 burgers

Directions:

  1. Start by measuring one cup of dried black beans and placing them in your Instant Pot. Select Pressure Cook and set the timer to 35 minutes.
  2. In the meantime, start preparing your veggies and toppings. Chop the mushrooms, white onion and garlic. Grate the carrot and slice the cucumbers and tomatoes. Set aside.
  3. When the Instant Pot has a few minutes left, heat up a saucepan on medium heat with a bit of oil.
  4. Add in the mushrooms, onion, garlic and half of the grated carrot. Let simmer with the soy sauce and smoke flavouring for about 5 minutes.
  5. Drain the black beans and add directly into the saucepan. Mix until all of the ingredients are combined within the pan. Cook for a few more minutes.
  6. Remove from heat and preheat the oven to 350°F/175°C.
  7. Start forming 4 nicely sized patties with your hands and place them on a baking sheet. No need to oil the pan!
  8. Bake for 8 minutes.
  9. Remove from the oven and now it’s time to assemble your masterpiece! Add your favourite toppings and enjoy!
  10. You can store the other patties in a container in your fridge and re-bake them again! They will stay fresh for about 1-2 days.

Quick Tips:

  • If you have never cooked with liquid smoke flavouring before- you should totally start! I order mine from Amazon or buy it at Food Basics. It’s a great addition to any food and adds that delicious smoky flavouring 😛
  • You can also add cheese to the bean burger mix and bake it in! It tastes delicious and is a great substitute to a regular cheese burger ⚡️
  • Thank you for reading my recipe! Be sure to check out my Instagram page for more healthy lifestyle and nutrition tips 💪🏼
Recipes

Chickpea Tuna

I’ve never been a huge fan of fish, but I’ve always loved the creaminess and texture of tuna! Something about the way that mayo tastes in combination with the flakiness of tuna is just soo good. Here’s the thing though: there’s a much healthier alternative that doesn’t harm our fish friends!

I stopped eating tuna when I learned that for every pound of fish caught, up to five pounds of aquatic life is discarded and killed (this includes dolphins and turtles!) And I’m sure that we have all heard the statistic that we will have fishless oceans by 2048.

Now is the most important time to make sustainable life choices that do as little harm as possible. That’s why I love this recipe- it’s 100% vegan, tastes just like tuna and is even easier to prepare! It’s also a rich source of vitamins, minerals, fiber and contains 26 grams of plant-based protein. Say goodbye to that fishy smell, and hello to the freshness of chickpeas 😎

Here’s what you’ll need:

Ingredients:

  • 1 small white onion
  • 1 clove of garlic
  • 1 can of chickpeas
  • 1 tablespoon vegan mayo
  • 2 sheets of sushi seaweed
  • half of a lemon

Preparation time: 15 minutes

Serving size: Serves 1-2 people

Directions:

  1. Start by preparing your ingredients: chop the white onion and garlic into small cubes. Strain and rinse the chickpeas.
  2. Heat oil in a medium sized pan and cook the onion and garlic for a few minutes on medium heat.
  3. Add in the strained chickpeas and continue cooking for about 5 minutes while stirring occasionally.
  4. Remove pan from heat and pour the ingredients into a large glass bowl (this is where you’ll mash them!)
  5. Use a masher to mash the chickpeas to a consistency that you like. You can mash them completely or leave some chickpeas whole- it’s up to you!
  6. Break up the sushi seaweed with your fingers and add in along with the mayo. Mix all of the ingredients together.
  7. Add lemon, salt and pepper to taste.
  8. Now you have some nice chickpea tuna! You can put it on a vegetable wrap, in a sandwich or even have it plain as a side. The possibilities are endless! Enjoy 🙂

Quick Tips:

  • I used canned chickpeas in this recipe because it speeds up the preparation time, but cooking dried chickpeas in an instant pot is healthier and a lot more cost efficient. So if you’re not short on time, pressure cook them instead!
  • I find that this recipe tastes better when it’s been chilled first, but serving it warm tastes good too!
  • Thank you for reading my recipe, now go put some good music on and have fun cooking🥳❤️
Recipes

Tofu Scramble with Fresh Veggies

Having an egg or two for breakfast is surprisingly not that healthy. Just one egg has about 185 milligrams of cholesterol which increases your risk of cardiovascular disease by 6%. Luckily, there is a much healthier alternative in town that won’t cause you to compromise your tastebuds. This vegan scrambled egg recipe is full of flavour, tastes just like real eggs but is much healthier!

I really like this recipe because it contains about 28 grams of plant-based protein, is high in Vitamin B12 and contains so many vital nutrients such as phytoestrogen which has so many health benefits. And all you need is tofu, nutritional yeast, some spices and fresh veggies!

Here’s what you’ll need:

Ingredients:

  • 1 small white onion
  • 2 cloves of garlic
  • 4 mushrooms
  • Half of a red pepper
  • Half a container of cherry tomatoes
  • ½ block of extra firm tofu
  • 4 tablespoons nutritional yeast
  • 1 teaspoon garlic powder
  • ½ teaspoon chilli powder
  • ½ cup of water
  • 2 tablespoons tamari or soy sauce
  • 5 drops of smoke flavouring

Preparation time: 10 minutes to prepare ingredients + 15 minutes cook time

Serving Size: Serves 1-2 people

Directions

  1. Start by preparing your ingredients: chop white onion, garlic, mushrooms and red pepper into small cubes. Cut the cherry tomatoes in half, set aside.
  2. Heat oil in a medium pan and stir in all of the veggies except for the cherry tomatoes. Let cook for a few minutes on medium heat.
  3. In the meantime, combine the nutritional yeast, garlic powder, chilli powder and water in a small bowl to make a paste.
  4. Using your fingers crumble the tofu into your pan while the veggies are frying. Mix together.
  5. Pour the nutritional yeast mixture into the pan making sure to distribute it evenly over the tofu.
  6. Add in the mini tomatoes, tamari and smoke flavouring.
  7. Mix all of the ingredients together and add in salt + pepper to taste.
  8. Cook for about 10 minutes and serve while hot with fresh avocados, toast and a smoothie! Voila, you have yourself a healthy breakfast 🙂

Quick Tips:

  • When you’re buying tofu, make sure that it’s non-GMO. Genetically modified soy does not have the same health benefits.
  • I typically buy my nutritional yeast from Bulk Barn because it’s the most cost efficient. However, you can order nutritional yeast on Amazon and even find it at Whole Foods. To learn more about the health benefits of nutritional yeast, click here!
  • Other than that, have fun cooking this healthy and nutritious breakfast 🙂
Recipes

Vegan Gingerbread Cookies

Gingerbread cookies are honestly my absolute favourite! And they’re perfect for when it’s getting cold out too. In Traditional Chinese Medicine, dried ginger is called Gan Jiang and is used in herbal medicine to warm the interior. Which basically means ginger produces a warming effect when consumed- this is great for boosting the immune system and fighting common colds!

I really like this recipe because it’s 100% plant based which means that there are no eggs, butter or dairy products. So if it makes you feel any better, these cookies are *healthier* than non-vegan gingerbread cookies 😉 And you also get to enjoy all of the benefits from the real dried herbs used!

Here’s what you’ll need:

Ingredients:

  • 3 ¼ cups flour
  • 2 teaspoons baking powder
  • 1 tablespoon powdered ginger
  • 1 tablespoon cinnamon
  • ½ teaspoon ground nutmeg
  • ½ teaspoon ground cloves
  • ¾ teaspoon salt
  • ¾ cup vegan butter (room temperature)
  • ¾ cup brown sugar
  • ¾ cup unsulphured molasses
  • 1 teaspoon vanilla extract

Preparation time: 15 minutes prep time + 8 minutes bake time per batch of cookies

Serving Size: Makes about 36 medium sized cookies

Directions

  1. In a medium sized mixing bowl, add in the flour, baking powder, ginger, cinnamon, nutmeg, cloves and salt. Mix and set aside.
  2. In a separate large bowl, add in the butter and brown sugar. Use an electric mixer to beat until smooth (you should see no brown sugar clumps!) Add in the molasses and vanilla and continue mixing until uniform & creamy.
  3. Begin adding the flour mixture to the butter mixture, one spoonful at a time while beating with the electric mixer. Make sure you scrape down the sides with a spoon.
  4. As the mixture starts forming a dough, use hands to knead.
  5. Once dough is formed, preheat the oven to 350°F/175°C.
  6. In the meantime, sprinkle a flat surface and rolling pin with flour.
  7. Place dough ball in the centre and roll outwards until it’s about 1/8 inch thick.
  8. Cut dough using cookie cutters, I used small and medium sized hearts but you can use any shape you want! The classic gingerbread man is very cute~
  9. Transfer cookie shapes to a baking sheet lined with parchment paper. These cookies don’t expand too much in the oven so you can place them about 1/2 apart.
  10. Bake for about 8 minutes.
  11. Let cool down a lil and enjoy while warm! You can also put them in a container and save them to snack on for a few days.

Quick Tips:

  • If you chill the dough for up to 3 hours, it will be much easier to handle and shape. It’s a good idea to chill it if you want your cookies to look more photogenic.
  • Make sure you use a larger bowl for the butter mixture because you need enough space to add the flour mixture in.